Generating images using artificial intelligence has become increasingly popular in recent years, thanks to the advances in deep learning techniques and the availability of large datasets. You may have seen stunning images generated by AI on the internet with Midjourney or OpenAI’s Dall-E where you can enter a text description and the AI will generate an image based on that description. Stable Diffusion by Stability AI is an open source alternative that still manages to generate some pretty amazing images.
Using the model directly can be a bit challenging and that’s where the Automatic-1111 Web UI comes into play, it’s a web interface that allows you to easily generate images using Stable Diffusion and comes with some other cool features like the ability to upscale images.
Why not use Dall-E or Midjourney?
While Midjourney and Dall-E are great, they impose some limitations on how you can use the generated images. Also they’re both paid if you need to use them frequently. Stable Diffusion on the other hand can run on your own hardware and it’s completely free to use.
Hardware requirements
You need to meet at least the following hardware requirements to run the Automatic-1111 Web UI:
- 16GB RAM
- GPU with at least 2GB VRAM, NVIDIA GPUs are recommended
- Linux, Windows 10+, Mac M1 or M2
- 10GB free disk space
The better your hardware, the faster the images will be generated. I tested on Nvidia GTX 1070 and Mac M1 Max and the results were pretty similar (around 10 seconds to generate an image).
Software requirements
You may have these on your machine already, but if not please make sure you install the following:
Windows
- Git
- Python 3.10 (make sure you add the python executable to your PATH)
macOS
Assuming you have Homebrew installed, you need to open a terminal and run the following commands:
brew install cmake protobuf rust [email protected] git wgetInstallation
To install the Automatic-1111 Web UI, you need to open a terminal and run the following commands:
git clone https://github.com/AUTOMATIC1111/stable-diffusion-webuimacOS
cd stable-diffusion-webui
./webui.sh
Windows
If you have a GPU with low VRAM (less than 8GB), you’ll have to open the webui-user.bat file inside the stable-diffusion-webui with a text editor (right click on the file and select “Edit”), then look for COMMANDLINE_ARGS= and set it as follows:
set COMMANDLINE_ARGS=--lowvramYou can also try --medvram if you have a GPU with 4GB VRAM.
Once you’re done, save the file and double click on it to run the Automatic-1111 Web UI.
Downloading a model
There are many models available on Hugging Face, including the original Stable Diffusion models. You may be tempted to pick the latest model (2.1 as of this writing), but it’s not recommended because v1.5 produces better results. Here are some links to the models:
- Stable Diffusion 1.5: Automatic 1111 will automatically download this one on the first run.
- Stable Diffusion 2.1
- Openjourney: Based off of Stable Diffusion 1.5, but tries to mimic the results of Midjourney.
If you choose to download a different model other than StableDiffusion 1.5, all you need to do it to copy the model file into the models/Stable-diffusion folder.
Usage
Once you have the Automatic-1111 Web UI running, you can open your browser and go to http://127.0.0.1:7860 to access the web interface. The Web UI address may be a bit different, so the best way to find it is to look at the terminal where you ran the Automatic-1111 Web UI. The interface should look like:

now you can try generating some images by entering a text description and clicking on the “Generate” button, here’s an example:
Inside a medieval hobbit home, ornate, beautiful, atmosphere, vibe, mist, smoke, chimney, rain,
wet, pristine, puddles, waterfall, melting, dripping, snow, creek, lush, ice, bridge, soup, loaves,
green, stained glass, forest, roses, flowers, color page, 4 k, tone mapping, trending on artstation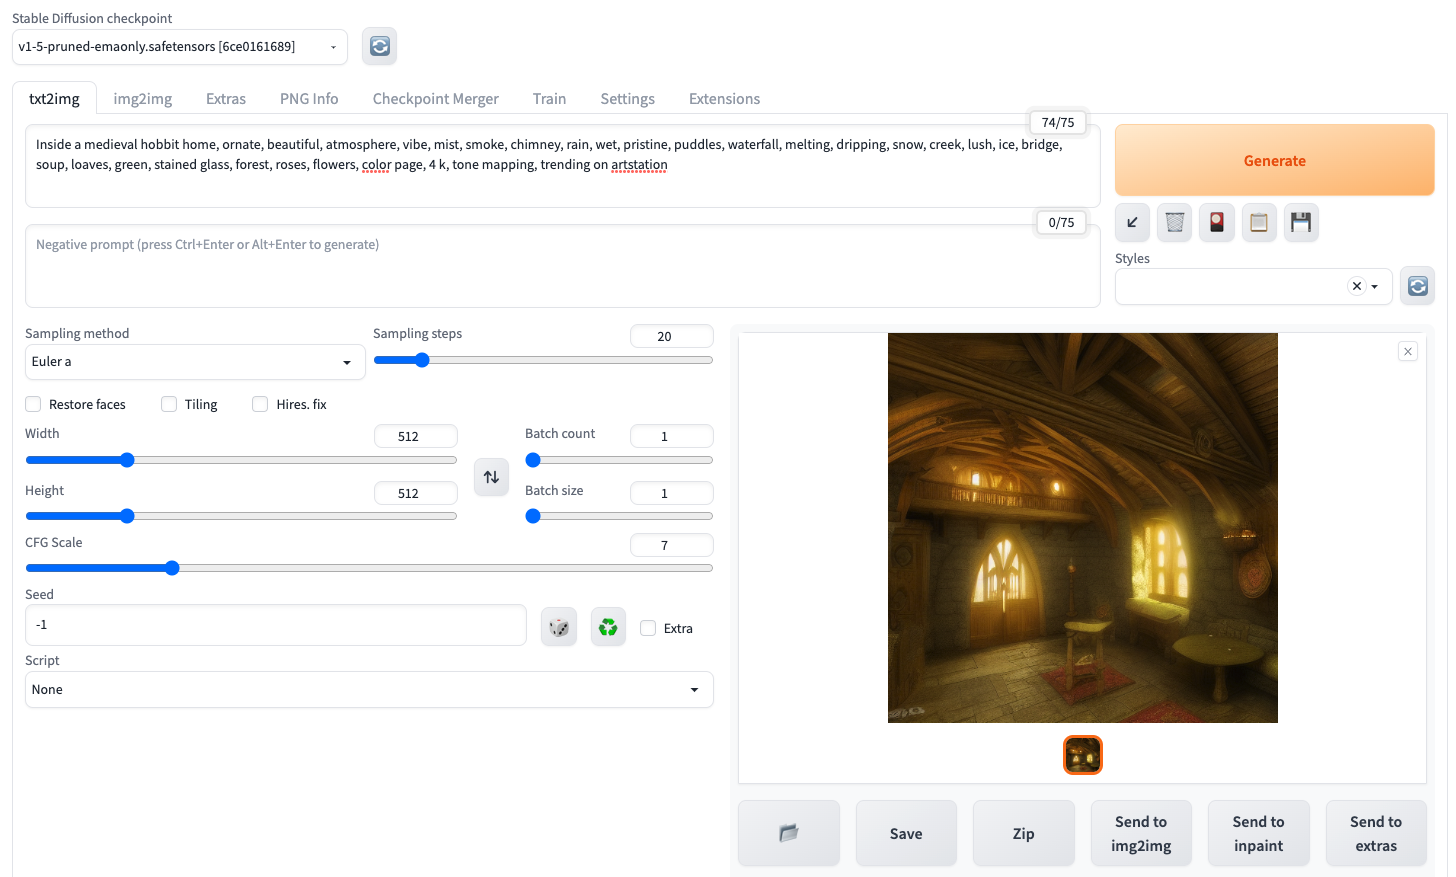
Inspiration
Coming up with a good text description is the hardest part in my opinion. Luckily Lexica can help with just that, it’s driven by commmunity contributions and it’s a great source of nice prompts that you can drop into the Automatic-1111 Web UI. Examples also come with parameters to help you get results as close as possible to the original image.
Upscaling
The generated images are usually 512x512 pixels, sometimes a little bit larger and that’s for a good reason: you want to generate images as fast as possible. However, if you want to use the generated images for other purposes, you may want to upscale them to a higher resolution. The Automatic-1111 Web UI comes with a built-in upscaler that can help with that.
To upscale images simply click the Send to extras which opens up the extras panel. Next, select ESRGAN_4x from the Upscaler 1 dropdown then click the Generate button. The generated image will be upscaled to 2048x2048 pixels and you can download it by right clicking on it and selecting Save image as....
There are other upscalers available, but ESRGAN has worked for me just fine. You can also use the Upscaler 2 dropdown to apply a second upscaler, but I haven’t found it to be very useful.
Conclusion
Stable Diffusion is a great tool for generating images and the Automatic-1111 Web UI makes it even easier to use. If you have any questions or suggestions, please feel free to leave a comment below.